Warning: The following paragraphs will be a bit technical, but that’s unfortunately the only way to differentiate between the users and administrators of such solutions. Hence, if you are not a sysadmin, or more than mildly interested in poking around with servers running Linux, configuring network interfaces and adding software to your servers.. get in touch with your local guru, as she or he will help you get things sorted quite nicely!
TL;DR: Quick and dirty copy-paste howto for both server/router and Raspberry Pi will follow in part three.
In part one we looked at setting the Raspberry Pi up with the needed connectivity to be able to download software from the Internet and explore it though SSH. Now, let’s get to the good stuff.
After getting the Pi onto the Internet, we can SSH into it and get tinc set up. You also need a dual stack connected server somewhere that talks to the Internet. I’m in luck as I happen to have native IPv6 connectivity all around, at work (ITsjefen AS), at my spare time NGO cyber anti crime organisation (Underworld), at home (Canal Digital/Telenor Norway) and of course the place that pioneered IPv6 connectivity in Norway – The Student Society of Trondheim (Studentersamfundet). For this project we’ll use a virtual server on a dedicated network at ITsjefen.
First you need to set up your server running Linux. I enjoy Ubuntu, so I’ll stick with Ubuntu 14.04.1 LTS 64bit for this one. After installing your server and getting it up and running IPv4 and IPv6 with dual stack connectivity you need to install and configure the tinc VPN software along with the needed configuration to act as a IPv6 router.
tinc
Tinc (yes, I know they spell their project name with small letters, even if it’s in the beginning of a sentence) is installed from the standard Ubuntu package repositories using your choice of apt or aptitude. I usually prefer aptitude. Run ‘aptitude install tinc‘ as root to get tinc installed. The configuration files are in /etc/tinc – the directory will seem a bit empty and you will need to populate it yourself with the proper configuration files.
The structure of the /etc/tinc directory should be as follows:
nets.boot – contains network that you would like to auto-connect/launch at boot-time: “v6router”
v6router – create this directory to contain the configuration of your IPv6 router.
The /etc/tinc/v6router directory should have the following files in it:
tinc.conf – the configuration file for this VPN.
tinc-down – script file to run at shutdown. Remember to make this an executable after creation.
tinc-up – script file to run at startup. Remember to make this an executable after creation.
hosts – directory containing one file: v6router
The /etc/tinc/v6router/tinc.conf file should look somewhat as follows:
Name = v6router
Mode = switch
The v6router file in the hosts directory should contain an IPv4 address line and an IPv6 subnet definition (of one IP). It also should have your public key to authenticate against connecting clients.
The layout of the file is as follows:
Address = 92.62.3X.XXX
Subnet = 2a02:2c8:ffff::1/128
Now you need to generate the private and public keys for your router you need to run the command ‘tincd -n v6router -K4096‘. This will create a key pair with the names rsa_key.priv and the public key being automatically added to the v6router-file in the hosts directory.
The files tinc-down and tinc-up are the script files that contain the commands needed to make your router act as a router and route a subnet to your Raspberry Pi and getting it connected to your router. You need to make these two executable scripts. The layout of the tinc-up script file is as follows:
#!/bin/sh
# Enable tinc - add routes
ip link set $INTERFACE up
ip -6 addr add 2a02:2c8:ffff::1/64 dev $INTERFACE
ip -6 route add 2a02:2c8:ffff::/48 dev $INTERFACE

# Static routing table – clients
ip -6 route add 2a02:2c8:ffff:2::/64 via 2a02:2c8:ffff::2
As you can see, the file contains both a definition of your router itself and sets up a /48 to use for your clients (e.g. your Raspberry Pi). If you only have ONE Raspberry Pi, a whole /48 is a bit over the top, but since we’re creating a design that can be used by hundred or thousands of nodes here, we’ll spend a whole /48. A /48 is also the default delegation handed out to Business customers at most ISPs so having a /64 for your router with a /48 added for it’s nodes makes sense Business-wise.
The file tinc-down does the above in reverse, tearing down the connectivity and routing when tinc is shut down. The contents of the file should be something like:
#!/bin/sh
# Static routing table - remove routes for clients
ip -6 route del 2a02:2c8:ffff:2::/64 via 2a02:2c8:ffff::2

# Disable tinc - remove routes and interface
ip -6 route del 2a02:2c8:ffff::/48 dev $INTERFACE
ip -6 addr del 2a02:2c8:ffff::1/64 dev $INTERFACE
ip -6 link set $INTERFACE down
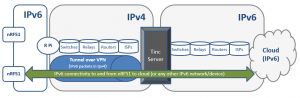
The idea behind the setup is so that you will know the node by it’s IPv6 address based upon it’s prefix and endpoint address. Hence, using this configuration your Raspberry Pi would be 2a02:2c8:ffff::2 and talk to your v6router server at 2a02:2c8:ffff::1. The v6router would then hand out the subnet 2a02:2c8:ffff:2::/64 to your Raspberry Pi, giving it a network to attach clients on it’s LAN on. An IPv6-enabled device on your LAN would then be able to talk to the Internet via the IPv6 VPN.
In the case of the project for Nordic these “clients” was the nRF51 kits with their Bluetooth connectivity. The nice part of this is that you are able to add and manage solutions based on static IPv6 nodes behind dynamic IPv4 network endpoints and the traversal of NAT have so far been no problem with the providers this have been tested with. Until we reach a stage with fully deployed IPv6 networking in both corporate and residential networks, this will in some way probably be the best way to achieve managed services based on this technology.
Future connected homes
The scope of the Bluetooth IPv6 connectivity are not yet observed by the general public, but I myself see a connected not too distant future home with smart devices that actually will tell my shopping application on my phone that “YES, your wife have already taken the last milk out of the fridge, you need to buy two, not one litres”. There will probably also be initiatives from makers of such devices, such as Electrolux and Samsung (yes I know they are already playing with both their heat pumps and their washing machines over your local WLAN) who will provide on-site remote service by the use of connected appliances that talk to services at the manufacturers network. Such services could be perhaps a monthly check in that will give you a nice status page saying that yes, your Samsung fridge motor is still running and that ice crusher machine on the freezer-part of the two-door monster is actually in need of a check up – Would you like a repairman on site or a remote diagnostic ran?
In part three I will provide the cut-and-paste setup howto for your own tinc IPv6 VPN mesh network and explore some of the things you need to think about before setting up any services that actually talk with the Internet on any such solutions. Until then I would very much recommend the Nordic Semiconductor IPv6 brewed coffee demo at CES2015. I hope lot’s of people have had good IPv6 brewed coffee! Hope to see that machine at Trondheim Developer Conference 2015 in October!